
- > Massive MoP Classic Phase 3 Patch 5.5.3 Notes: New Zones, Challenges, Dungeons, and More
- > MOP Classic Phase 3 Launches December 9 — Full Guide to New Raid, Zones, Bosses & Features
- > Ultimate Guide to Brewfest in Mists of Pandaria Classic 2025 (Rewards, Quests, Mounts)
- > Epic PvP Gear Will Not Be Upgradeable in Mists of Pandaria Classic
- > War Is Coming: Landfall Update Arrives in Mists of Pandaria Classic
- > Mists of Pandaria Classic Phase 2 PTR Update – What’s New?
Temple of the Jade Serpent MOP Classic Dungeon Guide – Walkthrough & Loot
Nestled deep within the Jade Forest, the Temple of the Jade Serpent is a serene yet Sha-corrupted sanctuary where the spirit of Shaohao trapped the Sha of Doubt centuries ago. Now, Sha-infected fiends have overrun the grounds, and players (level 85+) must restore balance. With four distinct encounters—ranging from elemental chaos to tribunal-style fights—this dungeon balances environmental threats and boss mechanics. Whether queued via the Dungeon Finder or wandering in from Jade Temple Grounds, be prepared for a mix of crowd control, AoE mitigation, and movement-heavy phases.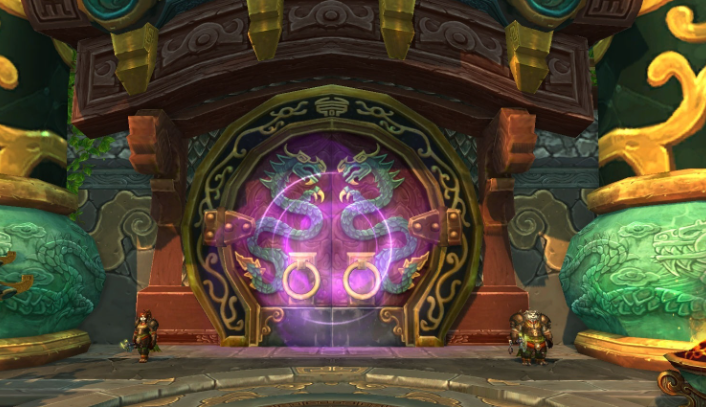
Dungeon Layout & Navigation
The instance is linear with occasional branching:
-
First Wing (Fountain of the Everseeing): Leads to Wise Mari.
-
Loop around the central hub to reach The Scrollkeeper’s Sanctum for Lorewalker Stonestep.
-
Continue to the Terrace of the Twin Dragons—home to Liu Flameheart.
-
Finally, ascend to the chamber of Sha of Doubt.
Use flight paths: Jade Temple Grounds, Dawn’s Blossom, or The Arboretum to reach the dungeon portal efficiently. Map-aware groups can skip redundant trash when speedrunning, take advantage of invisible shortcuts, or use target prioritization to minimize wipe risk.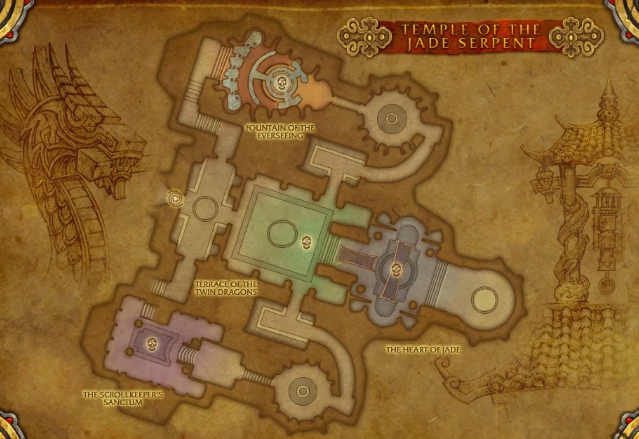
Trash Pack Strategies
Before Wise Mari (Fountain of the Everseeing)
-
Corrupt Droplet & Corrupt Living Water: Avoid standing in corrupted water—AoE splash deals heavy damage.
-
Fallen Waterspeakers: Interrupt Hydrolance and Tidal Burst casts. Use stuns if interrupts are scarce.
-
Pull Tips: Tanks should group mobs away from hazardous pools. Healers benefit from pre-emptive healing, as players endure periodic area damage.
Before Lorewalker Stonestep (Scrollkeeper’s Sanctum)
-
Mobs include Corrupted Scroll adds (Strife, Peril) and Haunting Sha.
-
Use crowd control and ranged bursts. Mark high-priority targets (e.g., Sha figments) for interrupt-heavy coordination.
-
Silence or stun adds before they combine into dangerous packs.
Before Liu Flameheart (Terrace of the Twin Dragons)
-
Trash includes Minions of Doubt, Sha-Touched Guardians, and Depraved Mistweavers.
-
Use line-of-sight to avoid add pulls. Tanks should prepare cooldowns—Trash packs often hit hard with combined elemental + Sha damage.
-
Healers: apply DoT cleanses and maintain strong AoE healing.
Final Hall to Sha of Doubt
-
Minor trash should be cleared swiftly. Immediately prepare healing and defensive cooldowns for the final boss.
-
Quick trash clear ensures optimal uptime on boss mechanics.
Boss Guides
Boss 1 – Wise Mari
-
Phase 1: Spawn of Elementals—Corrupt Living Waters spawn puddles when defeated. Tanks should kite adds away from group.
-
Hydrolance: High-damage ranged cast—interrupt or crowd-control the caster.
-
The boss is untargetable until the four elementals are down.
-
Phase 2: Once vulnerable, Wise Mari spins using Wash Away—a frontal jet that knocks back and deals massive damage. Everyone should circle around the boss’s back.
-
Tactics: Assign CC on droplet adds, and once Mari is active, melee stack behind while ranged maintain interrupts. Use defensive cooldowns pre-loop.
Boss 2 – Lorewalker Stonestep
-
Adds: Summons Corrupted Scrolls: Strife, Peril, Zao, etc., each casting different harmful Auras.
-
Strife: AoE damage; Peril: direct-targeted strike. Interrupt priority is Peril > Strife > others.
-
Healthstone-phase synergy: healers focus on dispels; tanks hold aggro on multiple adds.
-
Mechanics: Sha figments will target healers—use movement and cooldowns accordingly. DPS should burst scroll types with weakest resistances.
Boss 3 – Liu Flameheart
-
Phase 1: Adds Yu'lon and Fire Imps spawn. Focus Yu'lon adds first to prevent buffs stacking.
-
Breathe Fire: AoE cone on tank—rotate cooldowns.
-
Sha Empowerment: Adds that self-buff; prioritize interrupt/burst before buff triggers.
-
Phase 2 (at ~55%): Liu enters Sha phase—enraged, unleashing increased AoE. Healer upkeep must intensify; tanks use defensive abilities.
-
Tactics: AoE cleave, active mitigation on tanks, cleanse burning DoTs, soak group damage.
Boss 4 – Sha of Doubt
-
Twin Phases: Starts with adds (Sha casts), then main body emerges. Must destroy figments quickly to avoid group-wide AoE.
-
Split Agony: Boss splits damage across party—healers must heal firmly behind the split line.
-
Dreadful Blight: AoE unstable effect—spread out to mitigate.
-
Final Push: At 30%, Sha absorbs energy—group must DPS smartly while managing DoT pulsations.
-
Pro Tips: Use pre-placed healing (totems/mushrooms) moments before engagement. Balance AoE and single-target damage across phases.
Achievements & Challenge Mode
Key achievements:
-
Hydrophobia: Don’t touch corrupted water (Wise Mari area).
-
Cleaning Up: Complete the dungeon on Heroic (requires solo cleanup of scrolls).
-
Seeds of Doubt: Likely tied to Sha of Doubt quest/kill.
Challenge Mode Tips:
Complete in under 15 minutes for Gold and unlock the teleport “Path of the Jade Serpent”. Use invis potions or Rogue vanish to bypass the scroll library, stacking cooldowns on high-damage trash before Liu Flameheart.
Loot Table & Trinkets
| Boss | Notable Drops |
|---|---|
| Wise Mari | Elemental Water Staff (Healer), Essence of Serenity (Trinket) |
| Lorewalker Stonestep | Scrollkeeper’s Gavel (Healer/DPS), Scholar’s Shoulders |
| Liu Flameheart | Flameheart Spellblade (Tank/DPS), Jadefire Cuirass |
| Sha of Doubt | Doubtcrusher Shoulders (Tank), Mind-Shear Pendant |
Loot features primary stat upgrades—Intellect for healers, Mastery for tanks, and Spirit for DPS. Prioritize trinkets with group utility and proc synergy (e.g., Essence of Serenity’s heal proc).
Role-Specific Tips
Tanks:
-
Rotate active mitigation during AoE spikes (hydrance, fire breath).
-
Position smart: avoid puddles, group mobs, and hold aggro on temp adds.
Healers:
-
Keep preemptive healing on players near AoE zones.
-
Dispel DoTs, especially burning and Sha afflictions—key during Sha fight.
DPS:
-
Interrupt continuously on Hydrolance, scrolls, and flame jets.
-
Use AoE cleave for elementals/add-heavy packs; focus burst on boss during phases.
-
Skip trash with invis when speedrunning; save cooldowns for final boss.
Challenge Mode Speedrun Tips
-
Skip Library: Use invis potions or vanish to bypass Lorewalker area.
-
Cooldown Management: Use external cooldowns before Liu’s trash, not only on bosses.
-
Movement Buffs: Stack Mage Time Warp, Druid Stampeding Roar after Wise Mari to close gaps fast.
-
Pet Control: Dismiss pets before skips to avoid unnecessary pulls.
Conclusion
The Temple of the Jade Serpent blends lush aesthetics with high-pressure mechanics—offering both lore and challenge. From controlling Sha-tainted water around Wise Mari to managing Sha figments and DoT phases during the final boss, this dungeon demands careful coordination and adaptable play. Use this guide for clear strategies, loot planning, and Challenge Mode tips to streamline runs. Follow the tips, optimize your strategy, and dominate the temple with ease.
Table of contents
Buy WoW MoP Classic Products
Recommended Article