
- > Path of Exile 2 Voices Sapphire Guide – The Ultimate Endgame Jewel Chase Item
- > PoE 2 Orb of Sacrifice Guide: How to Use, Farm & Safely Upgrade Corrupted Gear (Patch 0.5.4)
- > PoE 2 Patch 0.5.4 Economy Guide: Best Currency Farming Strategies
- > PoE 2 Thaumaturgic Generator Guide: The Ultimate Passive Charge Engine Explained
- > How to Use Exceptional Verisium in Path of Exile 2: The Ultimate Runeforging Guide
- > PoE 2 Lazy Build Tier List: Best One-Button and Chill Endgame Builds in Patch 0.5
PoE 2 Trial of the Sekhemas: A Complete Guide to Entry, Zarohk, and Sekhemas Coins
The Trial of the Sekhemas in Path of Exile 2 is a crucial challenge for players looking to enhance their character through the Ascendancy system. It starts as an Act 2 trial but extends into endgame challenges where greater rewards and tougher encounters await. The pinnacle of this trial is Zarohk, the Temporal, a powerful boss who tests even the best builds. Additionally, the Sekhemas Coins, such as the Test of Will Barya, Test of Cunning Barya, Djinn Barya, and Test of Time Barya, allow players to modify their trial experience. This guide covers everything you need to know, from entering the trial to defeating Zarohk and using these special coins effectively.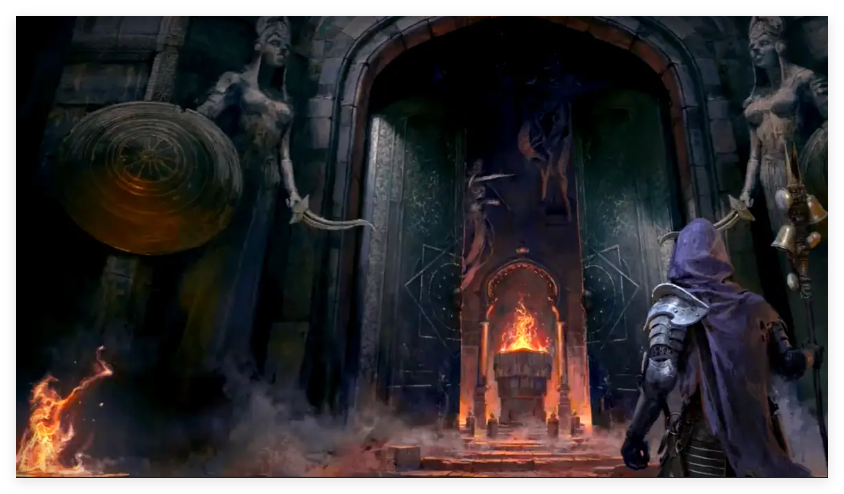
How to Enter the Trial of the Sekhemas
Early Game Entry (Act 2)
To access the Trial of the Sekhemas for the first time in Act 2, follow these steps:
-
Defeat Balbala, the Traitor:
-
Found in Traitor's Passage near Halani Gates.
-
Drops Balbala’s Barya, which grants access to the trial.
-
-
Use the Desert Map to Travel:
-
Return to the Ardura Caravan and navigate to the Trial of the Sekhemas.
-
Speak with Balbala, the Advisor to begin.
-
Endgame Access
Once you complete the campaign, the Trial of the Sekhemas becomes available at a higher difficulty with greater rewards. This requires a Djinn’s Barya Coin, obtainable through:
-
Drops in Waystone (Tier 1+) Maps.
-
Trading with other players.
-
Completing high-tier expeditions and arena challenges.
For the best gear and coins, check out SSEGOLD, where you can quickly get the currency and items you need to tackle these challenges. You can also explore a wide selection of PoE 2 items to enhance your build and improve your chances in the trial.
Understanding the Number of Trials in Djinn Barya
Each Djinn Barya coin has a detail called "Number of Trials," which represents the number of floors you’ll need to complete within the trial. Each floor increases the challenge and offers escalating rewards.
-
Level 60+ Djinn Barya: Typically features 3 floors.
-
Level 75+ Djinn Barya: Usually comprises 4 floors.
The more trials you face, the harder the enemies and traps become—but the rewards also scale up significantly. Make sure your character is prepared before attempting higher-level Djinn Barya trials. As Zarohk is at the final floor, if you want a challenge at him but don’t have the needed Djinn Barya, check SSEGold PoE 2 Items.
Understanding Honour and Room Selection
The Honour Bar determines your survival in the trial. Losing all Honour forces a restart.
-
Honour Loss: Taking damage depletes your Honour.
-
Honour Restoration: Cannot be restored with flasks; instead, it is replenished via trial rewards or shrine bonuses.
Each trial is composed of different rooms offering unique challenges:
-
Combat Trials: Face waves of enemies.
-
Trap Gauntlets: Navigate deadly traps.
-
Puzzles and Time Challenges: Solve mechanisms or defeat enemies within a set time.
Picking the right rooms based on your build is key to surviving and progressing efficiently.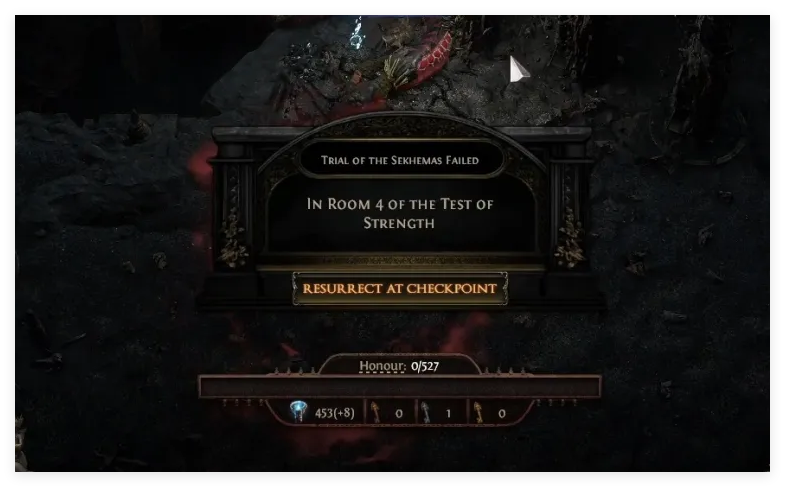
Boons and Afflictions
Select beneficial or harmful modifiers that affect the remainder of the trial.Major boons are represented by a bold, bright yellow bordered symbol, while minor boons appear within a plain yellow bordered symbol. Hovering over these icons will reveal their effects.
Boons offer various advantages during your trial run, such as restoring or protecting your honour, increasing Sacred Water and rewards, weakening monsters, or providing other beneficial buffs.
| Boon Type | Boon Name | Description | Merchant cost |
| Major Boon | Ahkeli's Guard | You cannot be Damaged for 1 second after taking Damage from an Enemy Hit | |
| Major Boon | All-Seeing Eye | The Trial Map is fully revealed Note: This overrides the Black, Golden, and Red Smoke afflictions. | 300-600 |
| Major Boon | Crystal Shard | The next Affliction you gain is converted into a random Minor Boon | |
| Major Boon | Dekhara's Necklace | You cannot receive any more Minor Afflictions | |
| Major Boon | Earned Honour | Restore # of your Honour on room completion | 600 |
| Major Boon | Garukhan's Favour | Ignore the first Damage taken from an Enemy Hit in each Room (note: this stacks between rooms) | |
| Major Boon | Holy Water | Gain a random Minor Boon when you venerate a Maraketh Shrine | |
| Major Boon | Imperial Seal | Traps are Disabled | 600 |
| Major Boon | Orbala's Leathers | Upon reaching 0 Honour, revive once with 50% less Honour | |
| Major Boon | Raincaller | Sacred Water found is doubled | |
| Major Boon | Reparations | Gain 2 Sacred Water when you take Damage from an Enemy Hit | |
| Major Boon | Sekhema's Cloak | Upon reaching 0 Life, revive once with Full Honour | |
| Minor Boon | Adrenaline Vial | Restore 30% of your Honour on entering a Boss Room | 220-320 |
| Minor Boon | Assassin's Blade | The next 10 non-Boss Monsters you Hit are killed instantly | 220-420 |
| Minor Boon | Balbala's Gift | Your next purchase from the Merchant has no cost | 280-320 |
| Minor Boon | Black Pearl | Traps deal 50% less damage | 280 - 320 |
| Minor Boon | Diverted River | Sacred Water found on this floor is doubled | 220-360 |
| Minor Boon | Enchanted Urn | 30% increased Effect of your Non-Unique Relics | 220 |
| Minor Boon | Flooding Rivers | 50% more Sacred Water found | 220-420 |
| Minor Boon | Fountain of Youth | Restore #(2.5%?) of your Honour when you venerate a Maraketh Shrine | 280-420 |
| Minor Boon | Fright Mask | Monsters deal 20% less damage | 220-320 |
| Minor Boon | Glowing Orb | The next time you go below 20% of Maximum Life, restore all Life, Energy Shield and 50% of Honour | 160-420 |
| Minor Boon | Hare Foot | 40% increased Movement Speed | 320 |
| Minor Boon | Honoured Challenger | 50% increased Honour restored | 220-420 |
| Minor Boon | Lustrous Lacquer | You have 50% more Defences | 220-360 |
| Minor Boon | Lustrous Pearl | Traps are slower | 280-360 |
| Minor Boon | Mirror of Fortune | The next Key you pick up is duplicated | 360 |
| Minor Boon | Moment's Peace | You cannot be Damaged until you complete the next room | 220-320 |
| Minor Boon | Orbala Statuette | You have 25% more Maximum Life | 280-360 |
| Minor Boon | Ornate Dagger | You and your minions deal 50% more Damage | 220-360 |
| Minor Boon | Sanguine Vial | Monsters have 30% less Maximum Life | 220-420 |
| Minor Boon | Silver Chalice | The next Minor Boon you gain is converted into a random Major Boon | |
| Minor Boon | Silver Tongue | 50% reduced Merchant prices | 280-320 |
| Minor Boon | Scrying Crystal | You can see an additional room ahead on the Trial Map | 280-420 |
| Minor Boon | Upward Path | Your Sacred Water found is increased by 10% on room completion (removed when you purchase something from the Merchant) | 280 |
| Minor Boon | Viscous Ichor | Monsters have 15% reduced Action Speed | 220-360 |
Major afflictions are represented by a bold, bright purple bordered symbol, while minor afflictions appear within a plain purple bordered symbol. Hovering over these icons will reveal their effects.
Afflictions impose various challenges during your trial run, such as hindering honour recovery, spawning extra traps, empowering monsters, disrupting Sacred Water generation, or obscuring rooms and rewards on the Trial Map.
| Affliction Type | Affliction Name | Description |
| Major Affliction | Corrosive Concoction | You have no defences |
| Major Affliction | Deadly Snare | Traps deal Triple Damage |
| Major Affliction | Death Toll | Take # Physical Damage after completing 8 rooms |
| Major Affliction | Ghastly Scythe | Losing Honour ends the Trial (removed after 3 rooms) |
| Major Affliction | Glass Shard | The next Boon you gain is converted into a random Minor Affliction |
| Major Affliction | Orb of Negation | Non-Unique Relics have no Effect |
| Major Affliction | Unassuming Brick | You cannot gain any more Boons |
| Major Affliction | Unquenched Thirst | You cannot gain Sacred Water |
| Major Affliction | Veiled Sight | Rooms are unknown on the Trial Map |
| Minor Affliction | Black Smoke | You can see one fewer room ahead on the Trial Map |
| Minor Affliction | Blunt Sword | You and your Minions deal 40% less Damage |
| Minor Affliction | Branded Balbalakh | Cannot restore Honour |
| Minor Affliction | Chains of Binding | Monsters inflict Binding Chains on hit |
| Minor Affliction | Chiselled Stone | Monsters Petrify on Hit |
| Minor Affliction | Costly Aid | Gain a random Minor Affliction when you venerate a Maraketh Shrine |
| Minor Affliction | Dark Pit | Traps deal 100% increased Damage |
| Minor Affliction | Deceptive Mirror | You are not always taken to the room you select |
| Minor Affliction | Dishonoured Tattoo | 100% increased Damage Taken while on Low Life |
| Minor Affliction | Fiendish Wings | Monsters' Action Speed cannot be slowed below base Monsters have 25% increased Attack, Cast, and Movement speed |
| Minor Affliction | Forgotten Traditions | 50% reduced Effect of your Non-Unique Relics |
| Minor Affliction | Golden Smoke | Rewards are unknown on the Trial Map |
| Minor Affliction | Haemorrhage | You cannot restore Honour (removed after killing the next Boss) |
| Minor Affliction | Honed Claws | Monsters deal 30% more Damage |
| Minor Affliction | Hungry Fangs | Monsters remove 3% of your Life, Mana, and Energy Shield on Hit |
| Minor Affliction | Iron Manacles | You have no Evasion |
| Minor Affliction | Leaking Waterskin | Lose 20 Sacred Water when you take Damage from an Enemy Hit |
| Minor Affliction | Low Rivers | 50% less Sacred Water found |
| Minor Affliction | Purple Smoke | Afflictions are unknown on the Trial Map |
| Minor Affliction | Rapid Quicksand | Traps are faster |
| Minor Affliction | Red Smoke | Room types are unknown on the Trial Map |
| Minor Affliction | Sharpened Arrowhead | You have no Armour |
| Minor Affliction | Shattered Shield | You have no Energy Shield |
| Minor Affliction | Spiked Exit | Take 25 Physical Damage upon Room Completion |
| Minor Affliction | Spiked Shell | Monsters have 50% increased Maximum Life |
| Minor Affliction | Suspected Sympathiser | 50% reduced Honour restored |
| Minor Affliction | Tattered Blindfold | 90% reduced Light Radius Minimap is hidden |
| Minor Affliction | Trade Tariff | 50% increased Merchant prices |
| Minor Affliction | Tradition's Demand | The Merchant only offers one choice |
| Minor Affliction | Untouchable | You are Cursed with Enfeeble |
| Minor Affliction | Weakened Flesh | 25% less Maximum Honour |
| Minor Affliction | Winter Drought | Lose all Sacred Water on floor completion |
| Minor Affliction | Worn Sandals | 25% reduced Movement Speed |
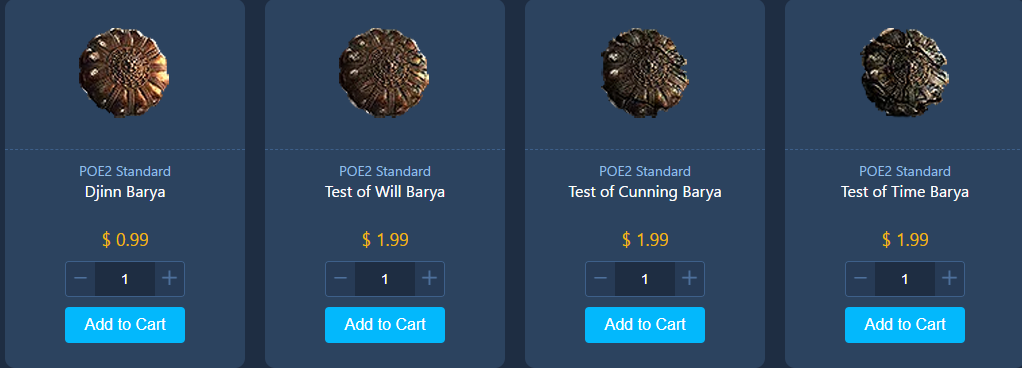
Sekhemas Coins and Their Effects
Sekhemas Coins modify your trial experience, providing different challenges and rewards.
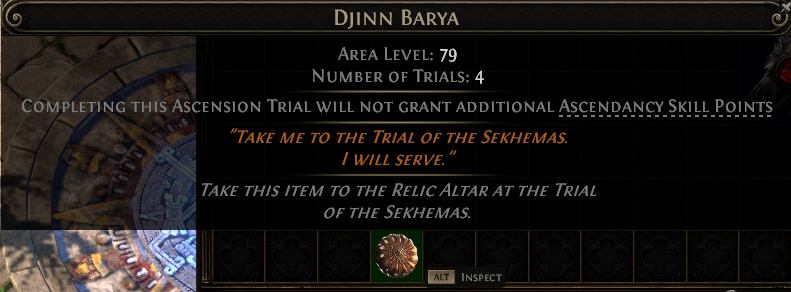
Djinn Barya
- Used to unlock and participate in the Trial of the Sekhemas
Test of Will Barya
-
Increases enemy damage and speed but boosts the quality of rewards.
-
Recommended for high-damage, tanky builds that can handle tougher encounters.
Test of Cunning Barya
-
Introduces additional traps and puzzle-based mechanics.
-
Best suited for high-mobility characters who can maneuver effectively.
Test of Time Barya
-
Adds time-limited rooms where objectives must be completed quickly.
-
Works well for fast-clearing builds with strong area damage.
How to Use Sekhemas Coins
-
Before entering a trial, place the desired coin on the Relic Altar.
-
Multiple coins can be used to stack effects (e.g., combining Test of Will and Test of Cunning creates a high-difficulty, high-reward scenario).
-
Coins are tradable and can be bought from other players, or sourced easily from SSEGOLD.
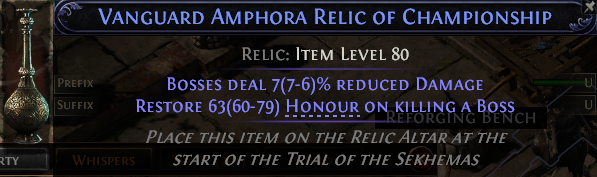
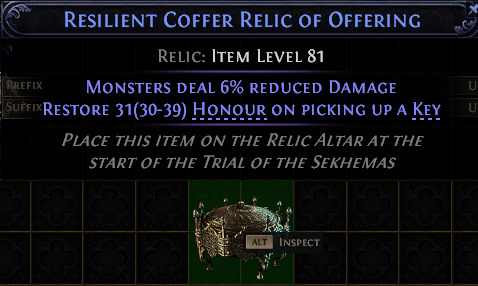
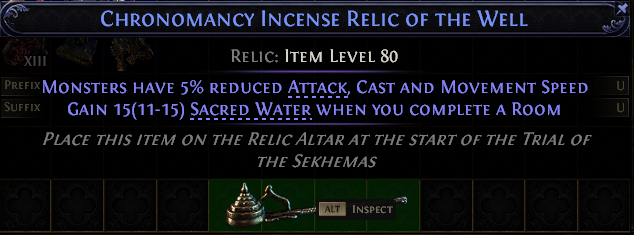
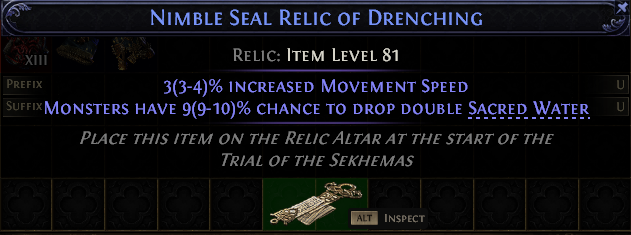
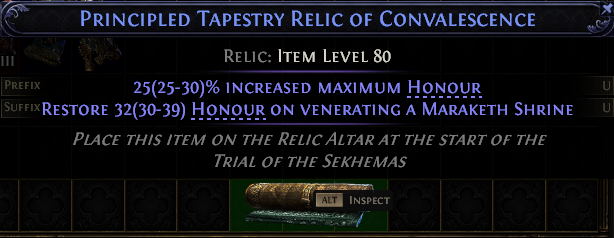
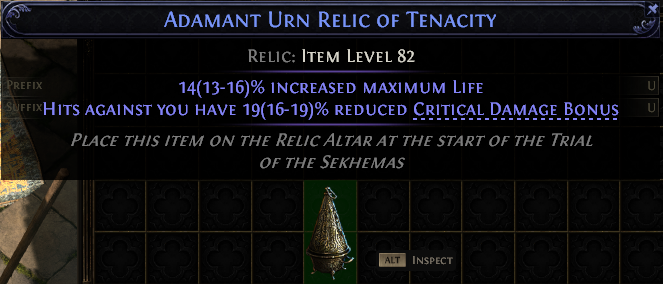
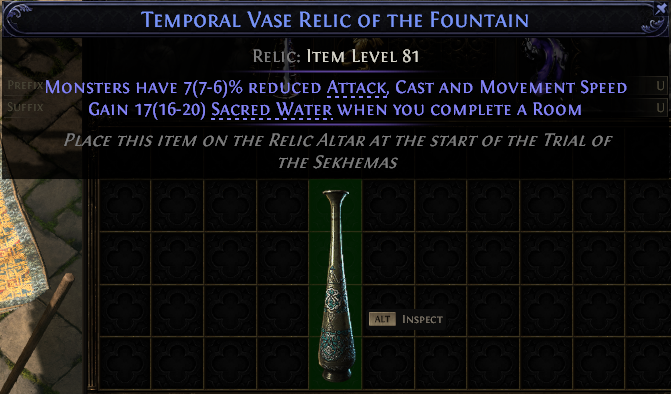
List of Relics in the Trial of the Sekhemas
Regular Relics
These relics can be obtained by completing rooms and defeating bosses within the trial. They provide useful bonuses during a run and can be combined for greater effect:
-
Amphora Relic – Provides additional effects during the Trial of the Sekhemas.
-
Coffer Relic – Provides additional effects during the Sekhema Trial.
-
Incense Relic – Grants additional effects during the Sekhemas trial.
-
Seal Relic – Grants additional effects during the Sekhemas trial.
-
Tapestry Relic – Grants additional effects during the Sekhemas trial.
-
Urn Relic – Grants additional effects during the Sekhemas trial.
-
Vase Relic – Provides additional effects during the Sekhemas' trial.
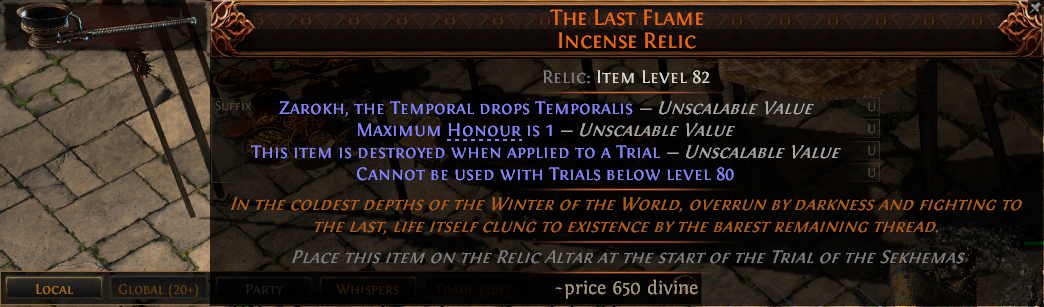
Special Relics
The following six relics can only be obtained by defeating Zarokh, the Temporal — the final boss of the Trial of the Sekhemas. These relics have powerful effects but are destroyed after use. Each relic also unlocks the potential for unique drops upon successful completion of the Trial:
-
The Last Flame
-
Dropped by Zarokh, the Temporal
-
Sets maximum honor to 1
-
Can only be used in level 80+ trials
-
Destroyed upon use
-
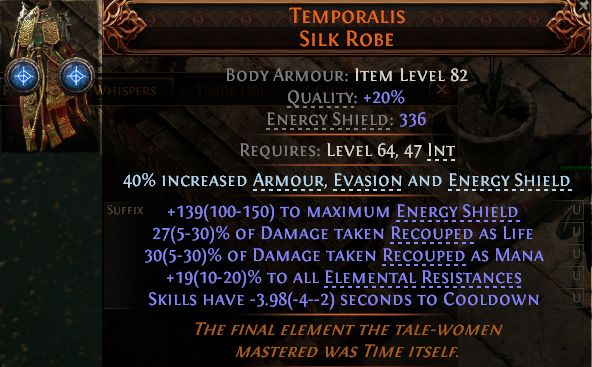
Successfully completing the trial with this relic equipped may reward you with Temporalis
-
-
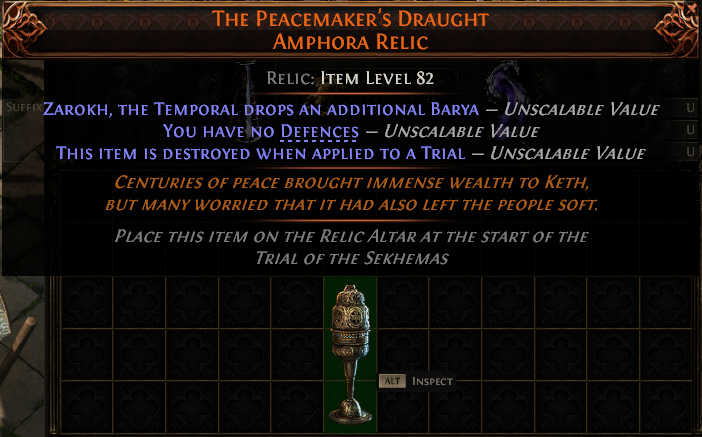
The Peacemaker
-
Dropped by Zarokh, the Temporal
-
Gives you an additional Barya
-
Removes all defenses while equipped
-
Destroyed upon use
-
-
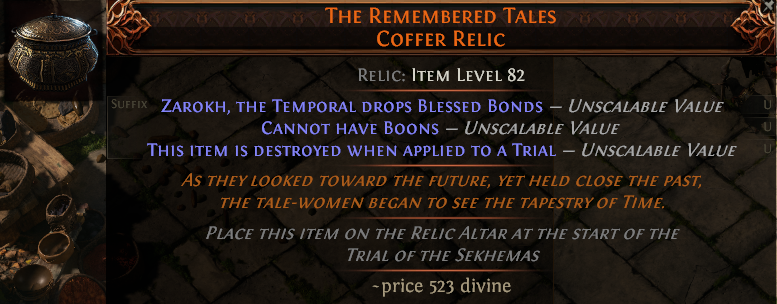
The Remembered Tales
-
Dropped by Zarokh, the Temporal
-
Prevents you from gaining boons
-
Destroyed upon use
-
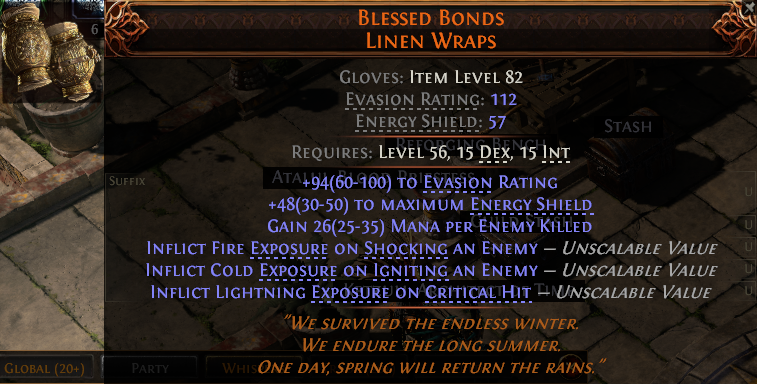
Successfully completing the quest with this relic equipped may reward you with Blessed Bonds
-
-
The Burden of Leadership
-
Dropped by Zarokh, the Temporal
-
Hides room details on the trial map
-
Destroyed upon use
-
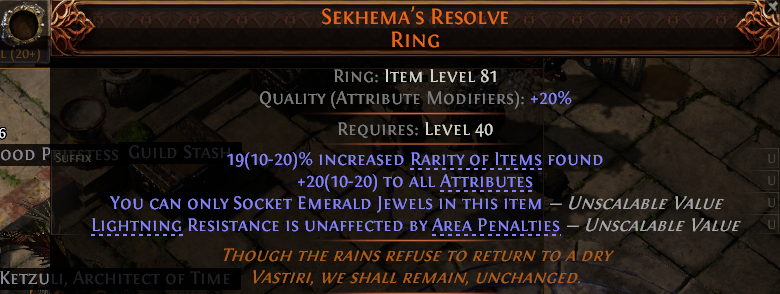
Successfully completing the trial with this relic equipped can reward you with Sekhema's Resolve Ring

-
-
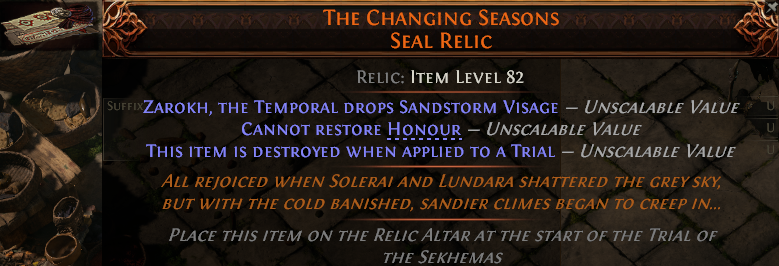
The Changing Seasons
-
Dropped by Zarokh, the Temporal
-
Prevents restoration of honor
-
Destroyed upon use
-
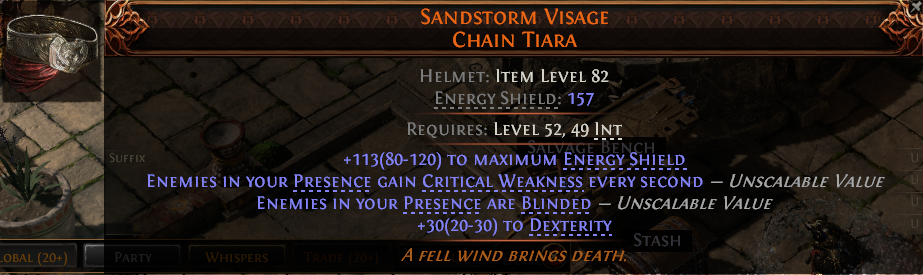
Successfully completing the trial with this relic equipped may reward you with the Sandstorm Visage
-
-
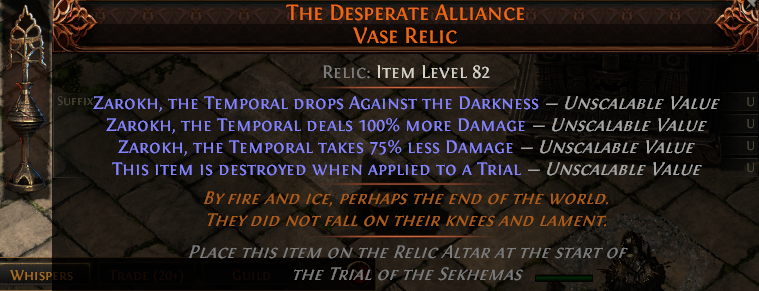
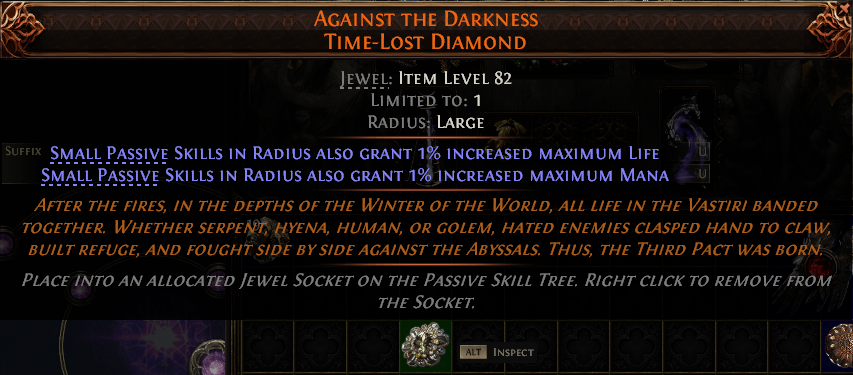
The Desperate Alliance
-
Dropped by Zarokh, the Temporal
-
Increases damage dealt by 100%, but reduces damage taken by 75%
-
Destroyed upon use
-
Successfully completing the trial with this relic equipped may reward you with Against the Darkness
-
Trial of the Sekhemas Bosses
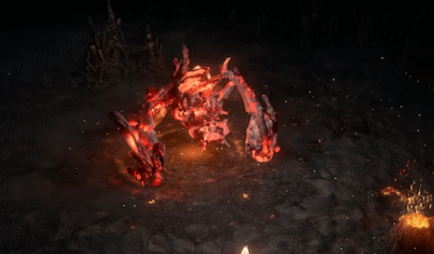
Rattlecage, the Earth Breaker (Floor 1)
-
Damage Types: Physical, Fire
-
Resistances: Physical, Fire, Lightning
-
Weakness: Cold
-
Rewards: Floor 1 completion
-
Strategy: Rattlecage has a fairly simple and predictable moveset, which makes it easy to react to. However, in the last 10% of its health, the number of falling stalactites and magma geysers increases dramatically. Stay mobile and listen to Balbala's warnings to avoid incoming attacks.
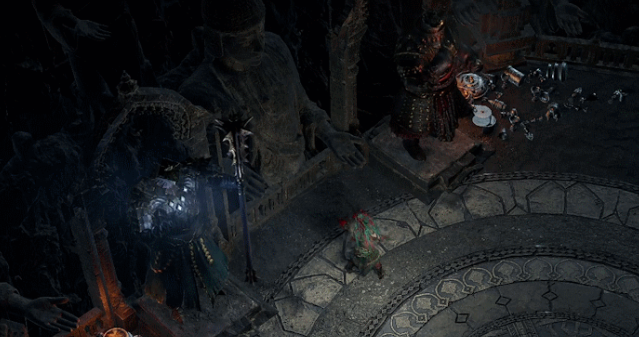
Terracotta Sentinels (Floor 2)
-
Damage Types: Physical, Cold, Fire
-
Resistances: Physical, Fire (Hadi), Cold (Rafiq)
-
Weakness: Cold (Hadi), Fire (Rafiq)
-
Rewards: Completed floor 2, second set of Ascendancy points
-
Strategy: Defeating a guardian triggers arena hazards based on the element of the defeated guardian. Kill Hadi first to avoid Rafiq's Cold Missiles and Cold Ground, which can slow you down significantly and make you vulnerable to follow-up attacks.
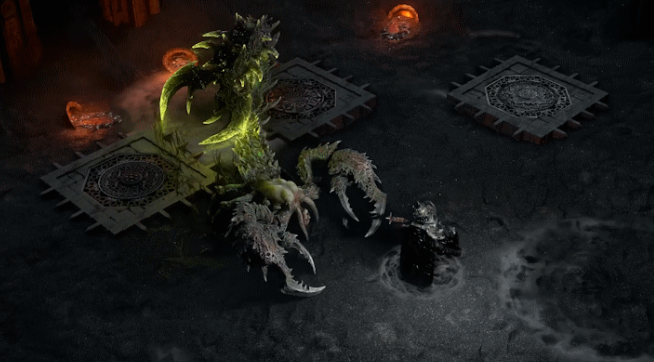
Ashar, the Sand Mother (Floor 3)
-
Damage Types: Physical, Chaos
-
Resistances: Physical, Fire, Lightning
-
Weakness: Cold
-
Rewards: Floor 3 completion, third set of Ascendancy points
-
Strategy: The arena has pressure plates that trigger traps that summon Adorned Beetles or fire poison darts. These traps deal high Health and Honor damage, making positioning critical. Avoid stepping on the plates and stay agile to avoid the swarms.
Zarokh, the Temporal (Floor 4)
-
Damage Types: Physical
-
Resistances: Fire, Cold, Lightning
-
Rewards: Completion of the Trial of the Sekhemas, Fourth Set of Ascension Points
-
Strategy: Zarokh's attacks are highly telegraphed but hit hard. Proper timing and positioning are essential for survival. Be especially careful when using relics such as The Last Flame, which sets your maximum honor to 1.
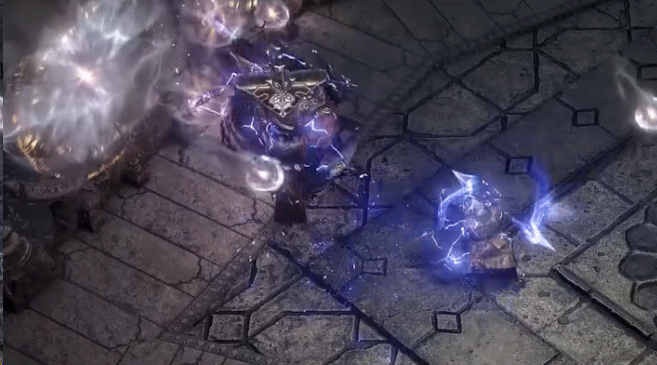
How to Defeat Zarohk, the Temporal
On the final floor of the endgame version of the Trial of the Sekhemas, players face Zarohk, the Temporal, a powerful adversary with distinct phases and mechanics.
Zarohk’s Attack Patterns and Phases
Zarohk has three phases, each progressively more difficult:
Phase 1: Standard Combat
-
Temporal Slices: Zarohk swings his blade, releasing shockwaves.
-
Time Ripple: Creates a ripple that slows movement and reduces attack/cast speed.
-
Summon Sekhema’s Shades: Summons shadow warriors that attack in unison.
Strategy: Stay mobile and avoid standing in slowed areas.
Phase 2: Temporal Rift
-
Time Fracture: Alters time flow, causing rapid speed-ups or slowdowns.
-
Blade Echoes: Releases ghostly blades that track players.
-
Chrono Collapse: A large explosion affecting all areas where time was previously fractured.
Strategy:
-
Watch for time anomalies and move accordingly.
-
Attack during slow phases and defend during speed bursts.
-
Use movement skills like Flame Dash or Blink Arrow to escape Time Fracture zones.
Phase 3: Unleashed Power
-
Sekhema’s Judgement: A massive arena-wide wave attack.
-
Temporal Collapse: The entire arena becomes unstable, shifting between past and future states.
-
Summon Infinite Shades: Constant waves of shadow warriors until Zarohk is defeated.
Strategy:
-
Prioritize high damage output to finish the fight before being overwhelmed.
-
Focus on AOE attacks for managing summoned shades.
-
Keep moving and avoid the unstable areas to prevent getting locked into Temporal Collapse.
How Relics Work in the Trial of the Sekhemas
Relics are special items that you can equip before starting the trial to modify your experience or enhance your chances of success. Here’s how they function:
-
Equipping Relics: Before beginning the trial, place relics on the Relic Altar alongside your Sekhemas Coin.
-
Relic Effects: Relics can boost Honour, increase damage, provide resistance bonuses, or even alter room mechanics.
-
Stacking Relics: You can equip multiple relics to stack their effects, allowing for greater customization and strategic advantage.
-
Obtaining Relics: Relics are found throughout the game world, in higher-tier maps, or purchased from other players through services like SSEGold.com.
Using the right combination of relics and coins can significantly alter the trial's difficulty and rewards, giving you an edge against even the toughest challenges.
Final Tips for Success in Trial of the Sekhemas
-
Choose Your Rooms Wisely: Don’t pick rooms that counter your build’s weaknesses.
-
Gear Up for Honour Management: Use relics that boost Honour regeneration.
-
Stack Chaos Resistance: Zarohk deals chaos and time-based damage.
-
Use the Right Sekhemas Coin: Pick a coin that complements your playstyle.
-
Trade for Coins and Gear: If you need better gear or specific coins, check SSEGold for trading options.
Conclusion
The Trial of the Sekhemas in Path of Exile 2 is one of the most exciting and rewarding challenges in the game. Whether you’re tackling it in Act 2 for your Ascendancy class or taking on Zarohk, the Temporal in its endgame form, preparation is key. Using Sekhemas Coins and Relics to tailor your experience allows for varied playstyles and unique rewards.
Mastering this trial not only strengthens your character but also unlocks powerful endgame possibilities. So gear up, choose your path wisely, and claim your place among the Sekhemas!
Good luck, Exile!
Table of contents
Recommended Article