
- > Arc Raiders Expedition 4 Requirements: Caravan Stage 5 Breakdown & Fast Farming Guide
- > ARC Raiders Wipe Guide: Fast-Track Fourth Expedition Requirements Before June 22
- > ARC Raiders Riven Tides Map Guide: Hotel Panorama Azzurra Extraction Strategy
- > ARC Raiders Stash Space Guide: Optimize Inventory Like a Pro
- > Arc Raiders Frequency Modulation Box Locations - Complete 2026 Guide
- > ARC Raiders Patch 1.21.0 & Flashpoint Update: Full Details Revealed
How to Get the Revival Augment Blueprint in ARC Raiders (Blue Gate Location Guide)
The Revival Augment blueprint can be obtained extremely quickly if you know where to look. While many players rush Harvester events after a patch, this blueprint often goes uncontested — especially early on.
If you’re looking to progress efficiently without risking high-value gear, this is a low-stress run that can be done even during daytime conditions. And if you’re preparing for multiple crafting attempts or upgrading gear fast, having extra ARC Raiders Credits and materials ready can save a lot of downtime — something many players already optimize through trusted marketplaces like SSEGold ARC Raiders items store.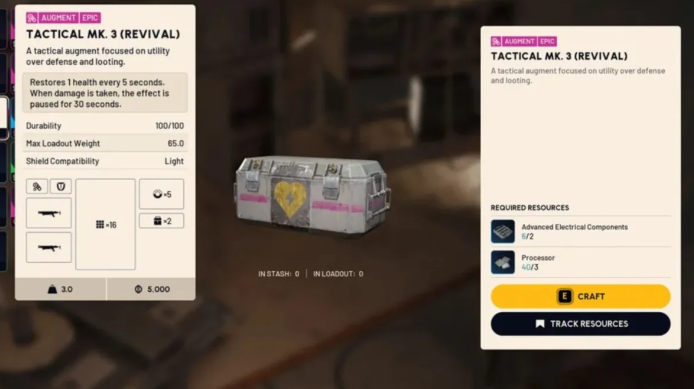
Exact Location: Blue Gate Breachable Room
The Revival Augment blueprint spawns in Blue Gate, specifically inside the breachable room found within the tunnel network.
Key details:
-
Location: Blue Gate
-
Area: Breachable room inside tunnels
-
Time: Daytime works fine
-
Difficulty: Low if reached early
-
Loot source: Weapon case inside the room
Players approaching Blue Gate from alternative tunnel entrances can zip down quickly and reach the room before others focused on world events.
Once inside, check the weapon case — blueprint acquisition can happen immediately, even on your first visit.
Additional Spawn Locations to Check
While the breachable room is the most consistent location, the Revival Augment blueprint can also spawn in medical rooms nearby.
If the breachable room has already been looted:
-
Check all medical areas
-
Loot lockers, cabinets, and suitcases
-
Security breach frequency appears slightly increased after the patch
Because of this, running a security breach-focused setup may be worthwhile if you’re farming multiple runs.
Revival Augment Stats and Effects Explained
Once learned at the Gear Bench, the Revival Augment offers the following effect:
-
Restores 1 HP every 5 seconds
-
Healing pauses for 30 seconds after taking damage
-
Healing works while moving
-
Focused on utility and survivability, not storage
Storage breakdown:
-
2 safe slots
-
5 healing slots
-
16 general slots
-
Supports light shield only
This makes it a lighter, more mobile alternative rather than a full replacement for high-end survival backpacks.
Revival Augment vs Survivor Backpack
While useful, the Revival Augment is best viewed as a budget or lightweight option.
Survivor Backpack advantages:
-
More total storage
-
Additional utility slot
-
Better overall versatility
Revival Augment advantages:
-
Passive healing without stopping
-
Lower material cost
-
Faster crafting and lighter loadout
If you favor mobility and sustained engagements, the Revival Augment has a niche — but most endgame players will still prefer Survivor setups.
Crafting Requirements
To craft the Revival Augment, you’ll need:
-
3 Processors
-
2 Advanced Components
These materials are fairly accessible, especially if you’re already running Blue Gate, Harvester zones, or breach-heavy routes.
Is the Revival Augment Worth Getting?
Absolutely — especially because:
-
It can be obtained on the first run
-
No special conditions are required
-
It adds another survivability option to your loadout pool
Even if you don’t plan to use it long-term, unlocking the blueprint early is always a smart move for future balance changes or build experimentation.
If you’re planning to craft multiple augments or want to stay ahead of future patches, many ARC Raiders players streamline progress by stocking up on credits and crafting resources via SSEGold ARC Raiders items store, minimizing downtime between runs.
Final Thoughts
The Revival Augment blueprint is one of the easiest new additions to secure in ARC Raiders — fast, low risk, and accessible even in busy patch periods. Head straight to Blue Gate, prioritize the breachable room, and you’ll likely walk out with it on your first attempt.
Table of contents
Buy ARC Raiders Products
Recommended Article