
- > Arc Raiders Expedition 4 Requirements: Caravan Stage 5 Breakdown & Fast Farming Guide
- > Where to Find the Survivor Augment Blueprint in ARC Raiders (2026 Complete Guide)
- > ARC Raiders Matchmaking Update & Myths Busted: What You Need to Know
- > ARC Raiders Nomadic Envoys Guide: How to Unlock the Tempest Blueprint Fast
- > ARC Raiders Wipe Guide: Fast-Track Fourth Expedition Requirements Before June 22
- > ARC Raiders Weapon Durability Guide: Why Common Gear is Now a Trap
ARC Raiders Riven Tides Map Guide: Hotel Panorama Azzurra Extraction Strategy
Embark Studios took their intense extraction shooter to the volcanic coastal ruins with the Riven Tides map update. While regions like The Blue Gate demand careful mountain navigation, Riven Tides drops players into a high-verticality, tight PvPvE meat grinder.
If you want to secure rare drops like the Powered Descender Blueprint, you need to dive directly into the map's premier red-outlined high-loot zone: Hotel Panorama Azzurra. This guide breaks down how to clear the resort layout, navigate its unique map conditions, and safely extract your hard-earned blueprints.
Hotel Panorama Azzurra: Layout & Verticality
The hotel's design forces tight, close-quarters combat while exposing players to deadly vertical sightlines.
Ground Floor & Lobby
This area features wide-open dining rooms littered with searchable containers. It serves as a hotbed for early-match player collisions. Always slice your corners tightly when navigating past the reception desks.
Upper Floors & Guest Rooms
The middle floors present narrow, debris-choked corridors. Use broken interior walls as reactive cover. These structural barriers block line-of-sight from patrolling drones and floating ARC units outside the windows.
The Rooftop & Balconies
This zone functions as a high-stakes parkour route. You can sprint across the exterior balconies to escape an unmanageable squad push or to gain a vertical drop on an enemy team below.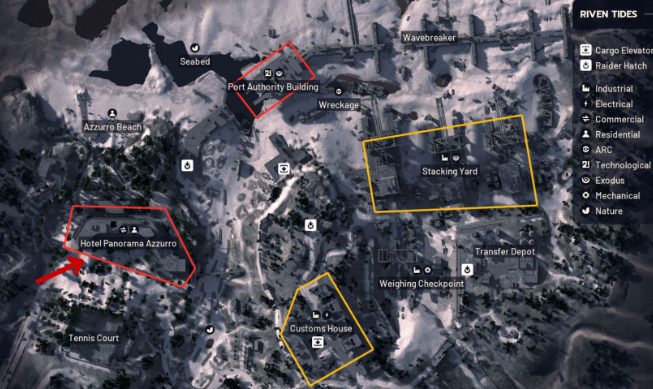
Container Optimization & Room 204 Lock
To maximize your efficiency inside the hotel, focus on high-density looting paths that yield top-tier weapon blueprints.
[Ground Floor Lobby] ──> [Elevator Shaft/Stairs] ──> [Room 204 Locked Door]
         │                                                      │
         └──> (Clear Red Security Lockers)                      └──> (Secure High-Tier Blueprints)
The Room 204 Vault
Room 204 is the primary target within the complex. Accessing it requires finding a rare Hotel Panorama Azzurra 204 Keycard from regional containers. Unlocking this room rewards players with rare end-game schematics.
Red Security Lockers
Pay close attention to the toolboxes and wall-mounted red security lockers scattered across the maintenance rooms. They feature a significantly boosted spawn rate for rare crafting materials and components.
Efficiency Sweeps
Avoid lingering in the open corridors. Enter a room, sweep all containers systematically, and drop to a lower level if you hear aggressive footfalls nearby.
Map Conditions: Surviving Beachcombing & Sky Threats
Riven Tides introduces unique environmental variations that completely alter how you approach the hotel perimeter.
The Beachcombing Dynamic
When the Beachcombing map condition triggers, tidal waters recede along the adjacent coastline. Players can use the Dockmaster’s Detector tool to locate buried weapon parts and caches in the sand. Keep a close eye on the hotel windows, as snipers frequently look down onto the exposed shoreline.
Airborne ARC Patrols
The open skies surrounding the hotel resort are monitored by flying ARC machines. Engaging them from the roof draws immediate attention from nearby players. Instead, pull these robotic threats into the covered lobby to dismantle them safely.
Extraction Strategies: Securing Your Loot
Finding top-tier loot means nothing if you cannot make it back to Speranza. The Riven Tides map features distinct extraction variants that require careful timing.
| Extraction Point | Risk Level | Strategy |
|---|---|---|
| Hilltop Hatch | Low | Located north of the resort. Offers excellent foliage and rock cover. Use this as your primary escape route when carrying rare blueprints. |
| Xfell Monument | High | A highly exposed central landmark. Avoid this zone unless you have full squad control, as it is a prime target for extraction campers. |
| Raider Hatch Key | Variable | Consumes a matching gate key for an immediate utility exit. This path bypasses standard choke points entirely. |
Protect Your Progression at SSEGold
One bad engagement near a hotel balcony can cost you hours of meticulous looting. If you want to bypass the unforgiving RNG of blueprint drops and eliminate the risk of extraction ambushes, let the marketplace handle the heavy lifting.
Skip the stressful gear grind and secure your competitive edge by purchasing reliable upgrade packages. Check out our platform to instantly stock up on your vital ARC Raiders Materials and items today!
Table of contents
Buy ARC Raiders Products
Recommended Article